Monday, February 18, 2019
Spaghetti Salad with avocado and basil
1. Sauce came together easily in blender
2. Wouldn’t make again although it wasn’t terrible. A little too vinegary for me. I’d consider borrowing the base recipe and tweaking it a bit— more basil for sure, and maybe some garlic, etc.
3. Used up two ripe and a little brown avocados pretty nicely though and it wasn’t crazy heavy so I could see this working for a summer dish!
Tamale Pie
Saw this recipe on the back of the Albers cornmeal box. Decided to make it !
1. I used soy chorizo and lentils (the TJs precooked) instead of beef. Because the soy chorizo is pretty oily and well-flavored, I did not use enchilada sauce. Instead I poured maybe 3/4 cup leftover roasted tomatillo salsa on top and threw in some diced Serrano chilis and called it. The filling is pretty independent of the rest of the dish so I could’ve thrown in mushrooms, other veggies, and spiced it how I wanted.
2. The cornmeal mix on the stove needs to be stirred/whisked pretty constantly in order to avoid clumping. I stuck to the recipe pretty close this time, but I don’t know that the flavor of the canned green chiles really came through— could probably omit or sub next time.
3. It was hard to spread the cornmeal dough up the sides of the pan. I’m not sure if it’s because I didn’t butter the pan enough or if I didn’t let the cornmeal mixture thickens enough, but I had trouble.
4. I topped the dish with a nice thick layer of cheese (ghost pepper cheddar from TJs, which honestly wasn’t that exciting, regular cheddar or pepper jack would’ve been just fine). And sprinkled cilantro on top. Green onions would’ve worked too. We served with sour cream and guac for some moisture.
5. It’s nice! An easy one pan meal and serves a crowd. Reheats well, and would make again.
Macadamia Nut Brownies
Made these for Valentines Day 2019. Recipe from Family Circle.
https://www.familycircle.com/recipe/bars/fudge-brownies-with-macadamia-nuts/
My notes:
1. They are one bowl brownies, which is always a plus
2. They are very nutty brownies, which the DH loves, but may not necessarily please a crowd. Could probably use pecans or hazelnuts and would be delicious.
3. The chocolate layer on top is lovely, and makes the brownie look fantastic. The negative though is that if the brownie is served cold from the fridge, the chocolate is hard and crunchy. So these are best served slightly warmed.
4. I used 61% chocolate (12 oz chopped)— why bother using chips when it’s getting melted anyway? I also added a spoon or two of whole wheat pastry flour with the white flour because again why not?
5. I used table salt in the brownie and sprinkled a little fleur de sel on top.
6. I used roasted unsalted Mac nuts
7. Brownies took 25 minutes in my oven. Maybe even less.
8. I’d make again! They are delicious.
https://www.familycircle.com/recipe/bars/fudge-brownies-with-macadamia-nuts/
Ingredients
Directions
- 1 of 5Heat oven to 350 degrees F. Line an 8-inch square baking pan with nonstick aluminum foil; set aside.
- 2 of 5Place 1 cup (6 oz) of the chocolate chips (or chopped chocolate) and the butter in a large bowl and melt together in a double boiler on the stove. Don't be tempted to heat it in the microwave, butter explosions are the worst to clean up.
- 3 of 5Whisk in sugar, then eggs. Stir in flour and salt until smooth. Fold in 2/3 cup of the chopped macadamia nuts and the vanilla. Transfer batter to prepared pan.
- 4 of 5Bake at 350 degrees F. for 25 to 29 minutes.
- 5 of 5Sprinkle remaining 1 cup chocolate chips over brownie and return to oven for 2 minutes. Remove from oven, and spread melted chips until smooth, to form a frosting. Top with remaining 3 tablespoons nuts. Refrigerate 1 hour to firm chocolate, then cut into squares
My notes:
1. They are one bowl brownies, which is always a plus
2. They are very nutty brownies, which the DH loves, but may not necessarily please a crowd. Could probably use pecans or hazelnuts and would be delicious.
3. The chocolate layer on top is lovely, and makes the brownie look fantastic. The negative though is that if the brownie is served cold from the fridge, the chocolate is hard and crunchy. So these are best served slightly warmed.
4. I used 61% chocolate (12 oz chopped)— why bother using chips when it’s getting melted anyway? I also added a spoon or two of whole wheat pastry flour with the white flour because again why not?
5. I used table salt in the brownie and sprinkled a little fleur de sel on top.
6. I used roasted unsalted Mac nuts
7. Brownies took 25 minutes in my oven. Maybe even less.
8. I’d make again! They are delicious.
Tuesday, February 12, 2019
S'mores Bars (Rice Crispy Smore Bars)
Recipe from Martha Stewart Living, Feb 2019 issue (https://www.marthastewart.com/1535740/smores-bars)
My Notes:
1. While I enjoyed the heavenly smell of marshmallows being broiled, I'm not entirely convinced the flavor was enhanced in the final product.
2. I used half milk chocolate and half semisweet chocolate (61%), but it was a rough chop with lots of chocolate "shards" that I think made the final product look messy. I would consider pressing chocolate chips into the top of the bar, and use the chopped chocolate to stir into the bar.
3. Definitely a good, chewy, crispy bar BUT if s'more flavor is what I'm after, there are other, better bars out there.
4. Probs not gonna make again.
Photos:
INGREDIENTS
DIRECTIONS
1. Butter a 9-by-13-inch baking dish. Line with parchment, leaving a 2-inch overhang on two sides; butter parchment. Preheat broiler. Butter a rimmed baking sheet; arrange marshmallows on it in an even layer. Broil until blackened in places, 1 to 2 minutes.
2. Melt butter in a saucepan over medium heat. Add marshmallows; stir until melted. Stir in cereal, graham crackers, and salt. Remove from heat; let cool 1 minute. Stir in half of chocolate. Press mixture into prepared dish; press remaining chocolate into top. Let cool completely. Lift out of pan using parchment; cut into shapes with a sharp knife or cookie cutter.
My Notes:
1. While I enjoyed the heavenly smell of marshmallows being broiled, I'm not entirely convinced the flavor was enhanced in the final product.
2. I used half milk chocolate and half semisweet chocolate (61%), but it was a rough chop with lots of chocolate "shards" that I think made the final product look messy. I would consider pressing chocolate chips into the top of the bar, and use the chopped chocolate to stir into the bar.
3. Definitely a good, chewy, crispy bar BUT if s'more flavor is what I'm after, there are other, better bars out there.
4. Probs not gonna make again.
Photos:
Pumpkin pie with Graham Cracker Crust
I had two cans of Libby’s pumpkin purée in the pantry, and I had leftover graham crackers from those crispy s’more bars I made a few weeks ago— so I decided to make pumpkin pie!
I used the recipe for pumpkin pie that’s on the back of the Libby’s can.
For the graham cracker crust:
12 sheets of graham cracker that I crushed with a blender into fine crumbs (6-7 oz)
6-8 TBS melted unsalted butter,
1/4 cup of white sugar.
I pressed it into a buttered 9x9 baking dish and let it prebake for 8 minutes at 350 degrees. The reason I’m not sure actually how much butter I used is that it exploded in microwave while I was trying to melt it so I’m not sure how much was left in the bowl before I added 4 ish more TBS. Anyway, I really liked this ratio for graham cracker crust. I let the crust cool once out of the oven for exactly 10 minutes. I chose the 9x9 square so that I could make pumpkin pie squares and not have to work on pressing the graham cracker crust up the sides of the dish (I hate that part).
For the pie, I followed the recipe exactly except for the spices — I added probably double the amount overall and added things like nutmeg, ground white pepper, and ginger. Probably would add allspice and cardamom next time. The ground cloves were freshly ground which makes such a difference. I baked the 9x9 tray for 15 minutes at 425, the lowered the temp to 350 and let it cook another 25-30 minutes until the center was just the tiniest bit wiggly. The knife test in the center of the pie doesn’t really work here, but the color deepens and it just looks (and smells) done.
I served it exactly two hours after pulling it from the oven and it was fantastic. It would also be fantastic with ice cream, salted caramel sauce, and whipped cream. Next thanksgiving, I'm not messing around with regular pie crust-- I'm just going to make it myself, with the graham cracker crust.
Monday, February 4, 2019
Chocolate Cardamom Cookies
Intro: I saved this recipe because I was intrigued by the idea of a vegan, gluten-free cookie that had no sugar in it, save for what was in the chocolate chips. The featured article on Sakara Life also seemed like the women who started it were boss ladies, and that made me happy :)
Recipe is from Food and Wine Magazine (Feb 2017 issue): https://www.foodandwine.com/recipes/chocolate-cardamom-cookies
Despite their healthy ingredient list, these gluten- and dairy-free chocolate chip cookies from Sakara Life are superdecadent. Almond flour gives them a nutty, crumbly texture and almond butter keeps them wonderfully moist.
My Notes:
This recipe has a lot of expensive ingredients-- nearly an entire bag of almond flour, a jar of honey, and a jar and then some of roasted almond butter. I felt as though the batter came together nicely by hand, though it did require a bit of elbow grease to really incorporate the almond butter and honey, both pretty thick liquids, with the almond flour. I used 16 oz of roasted almond butter and about 2 oz of raw almond butter because I did not feel like opening another jar of roasted almond butter. I used 61% dark chocolate that I cut into rough chunks. I used liquid raw honey as the recipe specifies. It also rested into the fridge for 2 nights. It made about 24 cookies
1. If you don't incorporate the honey all the way, it spills out of the cookie (see photo below)
2. In my oven, these cookies took 12 minutes-- the first batch I pulled at 14 minutes, and that was already overdone.
3. The "raw" dough tastes better in my opinion than the baked product. You can taste the cardamom better that way, and it almost tastes like badam barfi (indian sweet).
4. These are quite dense. I ate two and I feel super heavy and full.
5. I will use these as "breakfast" cookies because they aren't very sweet, and I bet they'd taste better dipped into liquid. These are not great warm--- I repeat: RESIST the urge to eat them straight out of the oven. They are not good. They are like 1,000 times better when they've cooled.
6. I previously said I would not make again because I ate two while they were warm. Now that I've had them cooled, I would make them again. The DH likes them too!
Recipe is from Food and Wine Magazine (Feb 2017 issue): https://www.foodandwine.com/recipes/chocolate-cardamom-cookies
Despite their healthy ingredient list, these gluten- and dairy-free chocolate chip cookies from Sakara Life are superdecadent. Almond flour gives them a nutty, crumbly texture and almond butter keeps them wonderfully moist.
Ingredients
- 4 cups almond flour
- 2 teaspoons baking powder
- 1 teaspoon ground cardamom
- 1 teaspoon fine Himalayan pink salt
- 2 cups roasted salted almond butter (18 ounces)
- 1 1/2 cups honey, preferably liquid raw (see Note)
- 1 teaspoon pure vanilla extract
- 6 ounces dark chocolate, chopped
Step 1
In a stand mixer fitted with the paddle, mix the almond flour with the baking powder, cardamom and salt at low speed until combined. At medium speed, beat in the almond butter, honey and vanilla until smooth. Add the chocolate chunks and beat until just incorporated. Cover the bowl with plastic wrap and refrigerate overnight.
Step 2
Preheat the oven to 350° and arrange racks in the upper and lower thirds of the oven. Line 2 large baking sheets with parchment paper. Scoop 1/4-cup mounds of the dough onto the prepared baking sheets and flatten into 1/2-inch-thick disks. Bake the cookies for about 15 minutes, until they are lightly browned and firm around the edges; shift the baking sheets from front to back and top to bottom halfway through baking. Let cool completely before serving. The cookies can be stored in an airtight container at room temperature for up to 3 days.
My Notes:
This recipe has a lot of expensive ingredients-- nearly an entire bag of almond flour, a jar of honey, and a jar and then some of roasted almond butter. I felt as though the batter came together nicely by hand, though it did require a bit of elbow grease to really incorporate the almond butter and honey, both pretty thick liquids, with the almond flour. I used 16 oz of roasted almond butter and about 2 oz of raw almond butter because I did not feel like opening another jar of roasted almond butter. I used 61% dark chocolate that I cut into rough chunks. I used liquid raw honey as the recipe specifies. It also rested into the fridge for 2 nights. It made about 24 cookies
1. If you don't incorporate the honey all the way, it spills out of the cookie (see photo below)
2. In my oven, these cookies took 12 minutes-- the first batch I pulled at 14 minutes, and that was already overdone.
4. These are quite dense. I ate two and I feel super heavy and full.
5. I will use these as "breakfast" cookies because they aren't very sweet, and I bet they'd taste better dipped into liquid. These are not great warm--- I repeat: RESIST the urge to eat them straight out of the oven. They are not good. They are like 1,000 times better when they've cooled.
6. I previously said I would not make again because I ate two while they were warm. Now that I've had them cooled, I would make them again. The DH likes them too!
Friday, February 1, 2019
Crispy Tofu
From: https://www.wellplated.com/ultra-crispy-unfried-tofu/
My notes:
Had to run the frozen package under hot water to be able to cut it open.
I liked the texture-- almost "juicy". Would consider simmering in salted water or water with soy sauce or broth.
I fried for 11 minutes-- didnt get super crispy. Maybe my heat wasn't high enough?
Would play with this preparation again.
Ingredients
- 1 block extra firm tofu — (15 ounces), do not use firm or silken
- 1 1/2 tablespoons canola oil — or grapeseed oil
Instructions
- Place tofu in the freezer for at least 3 hours or up to 3 months. No need to unwrap—just pop the package right into the freezer.
- When ready to cook, remove the tofu from freezer and unwrap. Discard any frost or ice that's formed on the outside, but do not tear the tofu. If the ice seems to be really stuck, leave as is.
- Bring a pot of water large enough to completely submerge the tofu to a boil (a medium/large saucepan works best). Gently slip the frozen tofu block into the water. Return the water to a boil, then reduce the heat to a gentle simmer. Continue simmering the tofu for 15 minutes, flipping once half way through. Carefully and immediately remove the tofu and set it aside on a paper towel-lined plate. Once cool enough to handle, cut into 1/2 to 3/4 inch-cubes.
- In a large wok or skillet, heat the oil over medium-high heat until very hot but not smoking. Add tofu pieces in a single layer. Let cook for 5 minutes on one side, then with a heat-proof spatula, flip the tofu pieces so that all sides brown, cooking for a few minutes on each remaining side. Once tofu is lightly browned and crispy (about 10-12 minutes total), remove from the pan. Use in your favorite stir fry, dip in peanut sauce, or add to soups or stews.
My notes:
Had to run the frozen package under hot water to be able to cut it open.
I liked the texture-- almost "juicy". Would consider simmering in salted water or water with soy sauce or broth.
I fried for 11 minutes-- didnt get super crispy. Maybe my heat wasn't high enough?
Would play with this preparation again.
Miso Sauce
From realsimple:
2 TBSP each:
rice vinegar
soy sauce
canola oil
white miso
You get a salty sauce that works to stir fry or to drizzle over veggies in an Asian flavored bowl. Could probs add fresh ginger, garlic, and chiles for more oomph.
Would make again!
2 TBSP each:
rice vinegar
soy sauce
canola oil
white miso
You get a salty sauce that works to stir fry or to drizzle over veggies in an Asian flavored bowl. Could probs add fresh ginger, garlic, and chiles for more oomph.
Would make again!
Chinese Eggplant
Loved this recipe-- yanked 100% from https://omnivorescookbook.com/chinese-eggplant-with-garlic-sauce
My Notes:
I googled how to chop the eggplant -- it involves cutting across the diagonal and rotating the eggplant to create maximum surface area.
I didn't have dark soy sauce, but used a little bit of blackstrap molasses for color, ad it worked great.
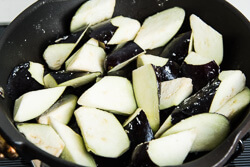
Obviously, the more oil the better. DO NOT overcrowd pan.
The sauce came together in a snap.
Would add green chiles next time.
INGREDIENTS
- 2 (400 grams in total) Chinese (long) eggplant, chopped
- 1 teaspoon salt
- 1 teaspoon cornstarch, plus more to coat the eggplant
- 1 tablespoon light soy sauce
- 1/2 teaspoon dark soy sauce (*see footnote)
- 2 teaspoons sugar
- 2 and 1/2 tablespoons peanut oil (or vegetable oil)
- 1 teaspoon minced ginger
- 3 cloves garlic, chopped
INSTRUCTIONS
- Chop eggplant into bite-sized pieces.
- (Option 1) Place eggplant in a large bowl and add water to cover. Add 1 teaspoon salt, mix well. Place a pot lid on top to keep the eggplant under water for 15 minutes. Drain and pat dry.
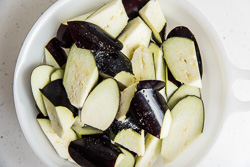
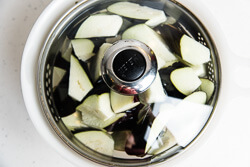
- (Option 2) Spread the sliced eggplant out on a paper towel. Sprinkle Kosher salt on both sides of the eggplant slices. Allow to rest for 45-60 minutes. Pat dry without rinsing.
- Combine light soy sauce, dark soy sauce, sugar and the remaining 1 teaspoon cornstarch in a small bowl, mix well.
- Sprinkle eggplant with cornstarch and mix by hand, until eggplant is evenly coated with with a thin layer of cornstarch.
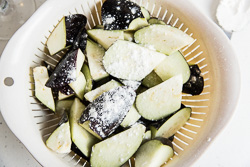
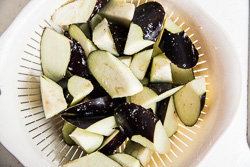
- Add 1 tablespoon oil to a nonstick skillet and heat over medium high heat until warm. Spread eggplant across the bottom of the skillet without overlapping. Grill the eggplant one side at a time until all the surfaces are charred and the eggplant turns soft, 8 to 10 minutes. Transfer to a plate. Cook the remaining batch(es) with the same method (I cooked two batches by using a 24″ skillet). If the skillet gets too hot and starts to smoke, turn to medium heat.
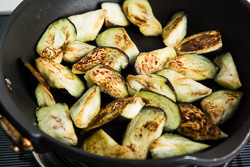
- Add the remaining 1/2 teaspoon oil and the ginger and garlic into the same skillet. Stir a few times until fragrant. Add all the eggplant back into the skillet. Turn to medium heat. Mix the sauce again until cornstarch is fully dissolved and pour it over the eggplant. Immediately stir a few times, until the eggplant is evenly coated and the sauce thickens. Turn to lowest heat and taste a piece of eggplant (be careful, it’s very hot). To adjust seasoning, turn to medium heat again, sprinkle eggplant with a pinch of salt and mix well (if you will serve this dish as a side, it should be salty enough. But for serving over steamed rice, add about 1/4 teaspoon salt).
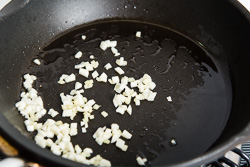
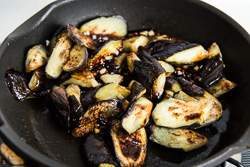
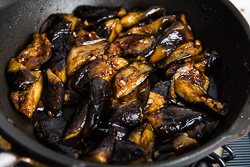
- Serve warm as a side or as main over steamed rice or noodles.
NOTES
The dark soy sauce will add color to the dish and make it look more appetizing. You can skip it if you don’t have any in your pantry.
My Notes:
I googled how to chop the eggplant -- it involves cutting across the diagonal and rotating the eggplant to create maximum surface area.
I didn't have dark soy sauce, but used a little bit of blackstrap molasses for color, ad it worked great.
Obviously, the more oil the better. DO NOT overcrowd pan.
The sauce came together in a snap.
Would add green chiles next time.
Subscribe to:
Posts (Atom)


